Trading blows: combat modeling

How much does killing enemies cost ?

In Arkham Horror LCG, managing enemies constitute a large fraction of the game. The majority of the enemies that investigators will have to deal with comes from the encounter deck, the others being introduced by scenario effects. They create significant threats that dictate the pace of the game.

In the encounter deck, usually only one third of the cards are enemies. Yet, it is common for a team of two investigators to have a dedicated fighter. Why do players have to dedicate so much of their resources to manage enemies? In this article, we will :

  • Use the resource trade model to evaluate the cost of killing an enemy.
  • Examine the effect of enemy stats and simulate fights.
  • Build up to a generic enemy rating model.
In this specific article, we will not address evading. A dedicated article will discuss when evading is worth it and how it can be evaluated.
Just hack into it…
… until it dies!

Modeling combat as a trade succession

Let’s first discuss how to model a fight with an enemy. The most common situation, especially when playing True Solo, is to have drawn the enemy during the encounter phase. A lot of the enemies that appear through scenario effects also come into play in the Mythos Phase, or at the end of the round when the act advance.

A fight, in our model, is a succession of fight actions until the enemy health is reduced to zero. The key variable is the number of successful hits that we need to reduce the enemy health to zero.

Let’s first imagine that the enemy needs 1 hit to be killed, and inflict zero damage and horror (puny creature, why do we even bother to kill it… poor lad).

To kill it, we have to spend an action. We then perform a skill test with our modified combat skill versus the enemy fight value. If successful, the enemy dies, and if not, we repeat the process until it does.

What is the total expected cost of this operation?

We always spend the first action, so we have a cost of at least:

C=1A=2.5R

However, the first fight action is not always successful. Lets call P_fail the probability of failing the test. This probability depends on the chaos bag, and the difference between the investigator modified skill value and the enemy fight value.

We have a probability P_fail of having to spend another action, P_fail^2 of having to spend two extra actions,  etc. The total cost of the fight is therefore:

The formula looks barbaric, but this is a mathematic series that converges to the following value:

Let’s look at what the values are for a standard Night of the Zealot Chaos bag. We have the following expected costs:

  • Testing at +4 : C = 2.7R (barely more than one action, we just fail on the Autofail).
  • Testing at +3 : C = 2.9R
  • Testing at +2 : C = 3.1R
  • Testing at +1 : C = 4.4R (close to two action worth)
  • Testing at +0 : C = 10R (4 actions)
  • Testing at  -1 : C = 40R (10 actions!)

Here, we can clearly see the effect of the breakpoints in the chaos bag. The cost goes up significantly once we drop bellow +2. Spending more than two actions on an enemy that should be killed in one hit is a recipe for failure in a scenario, so investigators should shoot for at least +1 in this specific bag.

Choosing the right combat skill value to test at

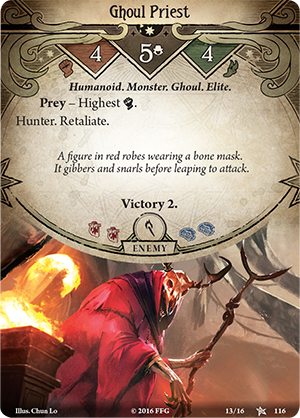
Is our poor investigator with 4 combat doomed to spend 10 actions and die against a 5 fight enemy?

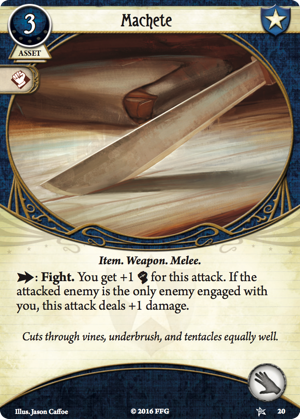
Fortunately, no. There are various ways to boost the combat value during a fight test.The most efficients are always unlimited boosts such as melee weapons, allies, tarots, etc. They however often need to be played before the fight, and will be included in the “base skill value” for this discussion. To reach higher skill values, the player has to spend some of its resources.

In the trade rate model, we evaluated the cost of a one time +1 skill boost at C=0.75R. In reality, this would be achieved through committed cards, spent resources on assets, etc. But how much to spend and is it worth it?

Let’s take the example of our investigator fighting with base 4 vs a 5 fight enemy. The investigator can spend 0.75R per action to test at 5 v 5 (+0). Or 2×0.75R per action to test at 6 v 6 (+1). Etc.

What is the right amount to spend and how high to go? This value is obtained by looking for the minimum total expected cost:

For our investigator starting at -1 (4  v 5), we have:

  • k=0 (Test at  -1) : 40R
  • k=1 (Test at +0) : 13R
  • k=2 (Test at +1) : 7.1R
  • k=3 (Test at +2) : 5.8 R
  • k=4 (Test at +3) : 6.3 R
  • k=5 (Test at +4) : 6.7 R

We see that by having the ability to boost its skills, our investigator can drop the expected cost from 40R to 5.8R, and that this minimum is achieved by aiming to test at +2.

Let’s take a breather and discuss the results. 

First, having the ability to modify the skill value is quite valuable, as it allowed a significant reduction in the expected cost to defeat our 1 hit enemy. However, the final cost is still higher than for an investigator who could have natively tested at +2 (3.1 R). The difference is the extra resources spent to increase the skill value by 3 during the fight.

The optimal test value for this specific case was +2. Below that, the likelihood of failure is just to high. Above that, the increase in success probability is not worth the extra resource cost. This optimum is dependent on the content of the chaos bag.

Finally, I want to point out that even an enemy that can be defeated in one hit can be a significant resource sink if it has a high fight. Each turn, investigators only gain 10R worth of resources (3 actions, 1 card, 1 resource = 3*2.5+1.5+1). In our example, dealing with the enemy cost more than half of this value.

Enemies that require multiple hits to kill

Not all enemies can be defeated in one hit. However, if we ignore the enemy phase an enemies attack, then the cost of each hit is independent. For a two hit worth enemy, we have to spend actions until we hit once, then start over until we hit once again. The total cost of a H hits enemy is just HxC.

When enemies fight back : retaliations

Of course, enemies wont sit quietly waiting forever for you to clubber them to death. They also have means to inflict damage and horror.

in a fight, enemies gets to attack on two different conditions. Once each round during the enemy phase, and each time an attack is missed if they have the Retaliate trait.

When an enemy attacks, they inflict their damages (D) and horrors (H) to the player. This, according to our resource model, is equivalent to adding an extra cost of 1.5*(D+H).

Retaliate effect is easy to model and we will start with it. We just modify the formulas above to add the extra cost each time we fail:

Let’s rework through the examples above for a one hit enemy inflicting 2 damages and 2 horrors.

If we test without modifying the skills, we get a cost of:

  • Testing at +4 : C = 3.1R
  • Testing at +3 : C = 3.7R
  • Testing at +2 : C = 4.5R
  • Testing at +1 : C = 9.1R
  • Testing at +0 : C = 28R
  • Testing at  -1 : C = 130R

We see that while the cost is not changed much if we are testing at +4, it quickly shoots up when the likelihood of failure increase.

Now, we can look again at the example of optimizing the skill value for an investigator starting at -1. We get the following costs:

  • k=0 (Test at  -1) : 130R
  • k=1 (Test at +0) : 31 R
  • k=2 (Test at +1) : 12 R
  • k=3 (Test at +2) : 7.23 R
  • k=4 (Test at +3) : 7.14 R
  • k=5 (Test at +4) : 7.07 R

We can make two observations here: the minimum cost we can achieve is now 7.07 instead of 5.8, and this minimum is now achieved when boosting up to +4. The threat of retaliation damage is enough to push us into a “beating everything but the Autofail” situtation.

Just keep in mind that these “optimums” are specific to our example. Here, the value depends on both the chaos bag content, and the enemy damage and horror. If I had chosen an enemy dealing only 1+1, the optimum would still have been to test  at +2.

When enemies fight back : enemy phase

Our problems doesn’t end here. If we draw an enemy during the mythos phase, even if the enemy has not Retaliate, we have three actions to kill it before it get to attacks us in the enemy phase. 

Unfortunately, this breaks the formulas where the cost of an enemy requiring H hits to be just H*C. Indeed, an enemy that can be killed in one hit will rarely get to attack in the enemy phase, as we need to fail our three fight actions for it to happen. However, enemies requiring two, or three hits are way more likely to survive up to the enemy phase.

This is beyond what I am willing to model analytically. However, I designed a small simulation script where I can simulate thousands of fights and average the results.

For each fight, the investigator repeatedly attack until the enemy is dead. Every three actions, the enemy gets to attack.

Let’s go back to our 4 v 5 combat, with an enemy without retaliate, that deals 2/2 damages and horrors.

If the enemy requires 1 Hit to kill, the costs are:

  • k=0 (Test at  -1) : 68R
  • k=1 (Test at +0) : 17 R
  • k=2 (Test at +1) : 7.7 R
  • k=3 (Test at +2) : 5.9 R
  • k=4 (Test at +3) : 6.3 R
  • k=5 (Test at +4) : 6.7 R

We see that at the optimum (still at +2), the increase in cost is marginal: 5.9R instead of 5.8R.

For a two Hits enemy, the cost is more than doubled. The costs per hit becomes:

  • k=0 (Test at  -1) : 70R
  • k=1 (Test at +0) : 19 R
  • k=2 (Test at +1) : 8.5 R
  • k=3 (Test at +2) : 6.1 R
  • k=4 (Test at +3) : 6.4 R
  • k=5 (Test at +4) : 6.7 R

At the optimum, the cost goes up to 6.1R.

For three Hits enemies, the cost per hit becomes:
  • k=0 (Test at  -1) : 71R
  • k=1 (Test at +0) : 20 R
  • k=2 (Test at +1) : 9.3 R
  • k=3 (Test at +2) : 6.8 R
  • k=4 (Test at +3) : 7.0 R
  • k=5 (Test at +4) : 7.0 R
 The bump in cost at optimum becomes more noticeable, as it increases to 6.8R. Even though it is still at +2, we can see that it becomes more and more enticing to try to avoid the attack.

Discussion

Pffew, that was a lot of numbers. What to take of it ? 

The first learning is which are the parameters that control the total cost of a fight. They are, in descending order of impact :

  • The number of hits required: you may have noticed that nowhere in this post have I mentioned the enemy HP value. Because what really matters is how many actions and tests are needed. The cost of the fight increase more than proportionally with the number of hits needed to finish an enemy. This is why weapons and card such as Vicious Blow and Beat Cop(2), that can deal an extra damage and reduce the number of hits required are so powerful.
  • The base skill vs enemy fight values: the cost of a fight is very dependent on how high your stat (including permanent modifiers) is in comparison to the enemy fight value. Once again, this is why assets that give a permanent/repeatable boost are so valuable.
  • The retaliate trait: oddly enough, for most enemies, the damage and horror values are not important. Except when they have Retaliate. Retaliate enemies with significant damage/horror values will force the player to commit extra resources to the fight.
  • Damage and Horror values: if the enemy doesn’t have retaliate, and can be killed with two hits or less, they don’t matter much. As the number of hits required becomes larger, the threat of having to deal with an attack increases and the cost increases with it.

Another interesting find is that the skill value to shoot for increases when the enemy has retaliate. This might seem intuitively obvious, but it has another consequence. Retaliate increase the cost of failing fight actions. But what if something else is lost? If we are using a gun / spell asset to fight, each fight action is also costing us uses. This is why attacks using limited resources should be performed at a higher skill value than attacks using melee weapons.

The last thing to discuss is the cost per hit we saw in our examples. This cost varies from 2.7R (Mark fighting a Swarm of Rats) to 7.07R for a 4 Combat vs 5 Fight against a retaliate enemy. As investigators get 10R worth of resources every round, it is easy to see why even an enemy that can be dealt with in two hits will likely require more than one turn worth of resources. This is why drawing an enemy is always a difficulty spike, and why players usually “save-up” some resources to handle these spikes by pre-playing weapons and fight assets/holding onto skill cards. In multiplayer, players can also team-up to help bringing down big enemies before they get to attack.
 

Rating enemies

One of the perks of all this work is that it allows to compare enemies between them. We still need a few assumptions to do so:

  • Content of the Chaos Bag : for the purpose of the model, I will keep the “Night of the Zealot/Standard” bag used for the examples.
  • Investigator base fight value: this should not change too much the relative ranking of the enemies, but have a great influence on the absolute cost given by the model. I will assume the base fight value is 3 (average investigator stat without any modifier).
  • Conversion HP/Hits: Enemies with even Health will have a Hits number = Health/2 (the model assumes some weapon is used). Enemies with 1 Health require 1 Hits. The score for enemies with odd health greater than one will be the average of Hits=(Health-1)/2 and (Health+1)/2.
  • Some enemies have additional costs: aloof enemies require an extra action to engage, some enemies make the player loose resources/discard cards on attacks, etc. These can be added in the simulation.
Let’s go through the enemies in The Gathering to see the results of the model. We have: 

Model cost: 3.1R

Rats are as easy as an enemy can be. Yet, the cost in the resource trade model is equivalent to taking 2 horrors. One can easily see why enemies are on average much more impactful than treacheries, when a Rotting Remains, a solid base treachery, can deal 3 horrors maximum.

Model cost: 4.0R

Ghoul Minions are representative of “easy” early campaign enemies. The extra horror dealt doesn’t matter much, the increase in cost comes from the one extra fight value.

Model cost: 7.5R

The first odd health enemy. If the investigator can dispose of it in one hit, the cost is actually 4.9R. If two are needed, it jumps to 10.1R. This is the true power of extra damages.

If an investigator has no weapon, the cost would be 16.2R (three hits required). This illustrates why being caught unprepared by an enemy can wreck a scenario.

Model cost: 10.3R

For an enemy with Victory 1, the Icy Ghoul is easy. Yet, the cost is already over what an investigator gets in a round (10R).

Moreover, it has to be said that the Icy Ghoul may not spawn engaged to you. If you have to move to the Cellar before fighting, it removes one of your actions and makes the Ghoul more likely to attack. This pushes the cost to 11.4R.

Model cost: 12.1R

The Flesh-Eater is a bit tougher than the Icy Ghoul. Its very low agility value makes it tempting to discuss the value of evading, but this is not the scope of this post.

As for the Icy Ghoul, if you have to move to the Flesh-Eater, its cost bumps up to 13.2.

Model cost: 18.3R (in True Solo)

The first boss of the game, and it has an odd health. The effective cost is 14.2R if you can defeat it in two hits, 22.3R in three hits.

It is also the first enemy with Retaliate. For the Ghoul Priest, this keyword is worth 2R in the total cost.

This is a scary enemy for a tutorial scenario. Yet, the doom clock in The Gathering leaves plenty of time for the players to prepare before triggering the fight. 

Conclusion

In this post, we extended the resource trade model to fighting enemies, one of the main tasks that players have to perform in a scenario. This is a big step toward a difficulty model for scenarios.

This model showed the importance of reducing the amount of tests that need to be performed, as well as some other key concepts:

  • “Beat everything but the Autofail” is often not the most cost-effective.
  • If the enemy has Retaliate, or if other costs (ammos, etc) are tied to the test, a higher skill value should be aimed.
  • Even a medium sized enemy can eat up most if not more than of one player round worth of resources. This reflects back to the introduction, and explains why having a dedicated fighter in a team of two is a valid strategy.
As all models, this one is not perfect. Here are the main shortfalls:
  • Evading is also a possible enemy management solution, and for some enemies, can be the most cost-effective one. This will be discussed in another post.
  • The values given by the model are tied to the content of the Chaos Bag. In reality, they would be slightly altered depending on the bag of the played scenario. The cost would also greatly increase in higher difficulties.
  • This model emphasize the existence of an optimal skill value to aim for. However, it just uses an average cost of 0.75R for a +1 skill boost. In real play, the player is on average less flexible: you can commit an unexpected courage for -1 card (1.5R) and +2 skill, but you cannot commit half the card for +1.
In a later post, we will look at estimating the cost of the other cards in the encounter deck: treacheries.
 

Leave a Comment

Your email address will not be published. Required fields are marked *

Scroll to Top